Replacing a broken leaf blower pull cord is a common DIY repair that most homeowners can complete with basic tools and patience. This guide provides a step-by-step process to get your leaf blower operational again, typically taking 30-60 minutes. You will need a screwdriver set, needle-nose pliers, a utility knife, a lighter, and a new pull cord of the correct diameter and length, usually around 40 inches for handheld models.
Understanding Your Leaf Blower’s Starting Mechanism
The recoil starter assembly in a gas-powered leaf blower converts a manual pull into the rotational force needed to start the engine. Pulling the cord spins a pulley, which engages the engine’s flywheel. A coiled spring retracts the cord. Over time, friction, wear, or aggressive pulls can cause the cord to fray and break. While a broken recoil spring can also be an issue, a snapped cord is the most frequent cause of a non-starting blower related to the pull mechanism.
What You’ll Need: Tools and Replacement Parts
Gathering the right tools and materials beforehand ensures a smooth and efficient repair process.
Essential Tools for the Job
You won’t need an elaborate workshop for this repair. Here’s a list of the most commonly required tools:
- Screwdriver Set: You’ll likely need Torx bits (T25 or T27 are common for securing the housing) and possibly a Phillips head for some models. A security bit set can be useful.
- Needle-Nose Pliers: These are invaluable for manipulating small parts, untying stubborn knots, and threading the new cord.
- Utility Knife or Scissors: For cutting the new pull cord to the correct length.
- Lighter or Torch: Essential for melting the ends of the new cord to prevent fraying, ensuring it slides easily and doesn’t unravel.
- Spring Clamp (Optional but Recommended): Can be very helpful for holding the recoil spring under tension if you need to re-wind it, preventing it from snapping back unexpectedly.
- Marker: To mark the pulley’s position if you need to remove it completely.
Choosing the Right Replacement Cord
Selecting the correct replacement cord is crucial for durability and proper function.
- Cord Diameter: Pull cords come in various thicknesses (e.g., 3.0mm, 3.5mm, 4.0mm). Consult your leaf blower’s manual or measure the old cord’s diameter if possible. A cord that’s too thick won’t fit through the holes, and one that’s too thin might break prematurely or not engage the pulley correctly.
- Cord Length: While specific lengths can vary, a general guideline is around 40 inches for most handheld leaf blowers. It’s often better to start with a slightly longer cord and trim it if necessary, rather than having one that’s too short. Many replacement kits come with a generous length.
- Material: Opt for a high-quality, durable braided nylon or polyester cord designed for small engines. These materials offer good resistance to wear and stretching.
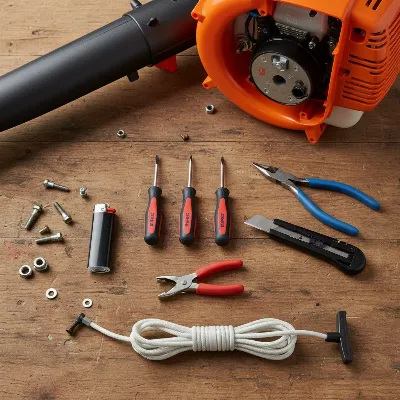 Essential tools and parts for DIY leaf blower pull cord replacement
Step-by-Step Guide to Replacing a Leaf Blower Pull Cord
Replacing the pull cord might seem daunting at first, but by following these steps carefully, you’ll find it’s a straightforward repair. Remember to work in a well-lit area and take your time.
Safety First: Preparing Your Leaf Blower
Before you touch anything, prioritize safety:
- Cool Down: Ensure the engine is completely cool to prevent burns.
- Disconnect Spark Plug: Locate the spark plug boot and pull it off the spark plug. This is a critical step to prevent accidental engine startup while you’re working.
- Fuel Switch Off: If your blower has a fuel shut-off valve, switch it to the “off” position.
- Work Surface: Place your leaf blower on a sturdy, clean workbench or flat surface.
Accessing the Recoil Starter Assembly
The recoil starter assembly is usually located on the side of the engine housing.
- Remove Housing Screws: Identify and remove all screws that secure the outer housing or the starter assembly cover. These are typically Torx screws. Keep the screws organized; some might be different lengths.
- Gently Separate: Carefully lift the starter assembly away from the engine. It might be attached by a few clips or simply seated in place.
Removing the Old Pull Cord
This step requires a bit of finesse, especially to manage the recoil spring.
- Release Spring Tension (if cord is still partially attached): If a piece of the old cord remains in the pulley, extend it fully and use a spring clamp to hold the pulley in this extended position. This prevents the spring from unwinding completely.
- Untie Old Cord: Untie any remaining knots securing the old cord to the handle and the pulley. If the cord is completely broken and gone, this step is simpler.
- Remove Pulley (if necessary): In some designs, you might need to remove a central screw (often a Phillips head) to lift the pulley out. If the spring unwinds, don’t panic; you’ll re-wind it later.
- Clear Debris: Inspect the recoil housing and pulley for any frayed remnants of the old cord or other debris. Clean it thoroughly.
Installing the New Pull Cord and Recoil Spring
This is where your needle-nose pliers and lighter come in handy.
- Melt Cord Ends: Take your new replacement cord and, using a lighter, carefully melt and pinch the ends. This creates a solid tip that won’t fray and will be easier to thread.
- Thread Through Handle: Guide one melted end of the new cord through the hole in your old (or new) pull handle. Tie a secure, simple knot (like an overhand knot or figure-eight knot) to hold the handle in place.
- Thread Through Housing: Feed the other end of the cord through the exit hole in the recoil starter housing.
- Thread Through Pulley: Now, guide the cord through the designated hole in the starter pulley. Tie another secure knot on this end, making sure it seats properly within the pulley’s recess. Trim any excess cord.
- Rewind the Recoil Spring (if it unwound):
- If your spring unwound completely, carefully place the pulley back into its housing. Make sure the inner end of the spring is correctly hooked onto the central post or tab within the housing.
- Rotate the pulley counterclockwise (the direction it would wind up) until the spring engages and you feel tension. Continue rotating the pulley 1.5 to 2 full turns beyond where the spring initially engages. This pre-tensions the spring.
- While holding the pulley under tension, thread the new cord through the housing hole if you haven’t already.
Reassembling and Testing Your Leaf Blower
Almost there! Now to put everything back together and ensure it works.
- Seat the Pulley: Ensure the pulley is properly seated and the cord is retracting smoothly into the housing with good tension. If it’s not retracting fully, you may need to add another half-turn of pre-tension to the spring. If it’s too tight or binds, reduce the tension slightly.
- Reattach Starter Assembly: Carefully position the recoil starter assembly back onto the engine housing. Align any tabs or mounting points.
- Replace Screws: Secure the assembly with the screws you removed earlier. Do not overtighten, as this can strip the plastic housing.
- Reconnect Spark Plug: Reattach the spark plug boot to the spark plug.
- Test: Pull the cord a few times to ensure it pulls out smoothly, engages the engine, and retracts fully. Then, try to start your leaf blower.
Troubleshooting Common Issues During Replacement
Even with a detailed guide, you might encounter a few snags. Here are some common problems and their solutions:
- Cord Won’t Retract Fully: This usually means the recoil spring doesn’t have enough tension. You’ll need to disassemble the starter, re-wind the pulley for an additional half to full turn, and retest.
- Cord is Too Short: If the cord doesn’t extend far enough for a full pull, you might need a longer replacement cord, or you may have too much pre-tension on the spring.
- Cord is Too Long: If the handle doesn’t seat properly against the housing when retracted, the cord is too long. Pull the handle out slightly, tie another knot near the handle, and trim the excess. Alternatively, if the pulley can take more wraps, you can add another half-turn of pre-tension to consume some of the slack.
- Recoil Spring Unwinds: If the spring jumps out or unwinds completely, you’ll need to carefully re-install it. The inner end typically hooks onto a central post, and the outer end sits against the housing wall. This can be tricky, and patience is key.
- Engine Still Won’t Start: If the pull cord functions correctly but the engine still doesn’t fire, the issue is likely not with the pull cord. Check the spark plug, fuel, air filter, and carburetor.
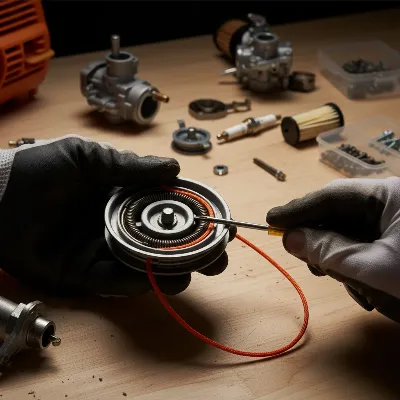 Hands demonstrating how to rewind a leaf blower recoil spring during pull cord replacement
Tips for Extending Your Pull Cord’s Lifespan
Prevention is always better than repair. A few simple habits can significantly extend the life of your leaf blower’s pull cord.
- Gentle Pulls: Avoid aggressive, jerky pulls. Instead, use a smooth, consistent pull until you feel the engine engage. A sharp, sudden yank can stress the cord unnecessarily.
- Full Extension, No Snapping: Pull the cord out fully, but avoid letting it snap back into the housing. Guide it back gently.
- Regular Inspection: Periodically check your pull cord for signs of fraying, cuts, or excessive wear. Catching these issues early allows you to replace the cord before it completely breaks, saving you from mid-task interruptions.
- Proper Storage: When storing your leaf blower, ensure the pull cord isn’t kinked or pinched, which can weaken it over time.
Conclusion
A broken pull cord on your leaf blower is a common, yet easily fixable, problem. By following this DIY guide, you’ve learned how to safely disassemble the starter assembly, replace the old cord with a new one, correctly tension the recoil spring, and reassemble your machine. This not only saves you the expense and wait time of a professional repair but also empowers you with a valuable skill. With a little care and attention, your leaf blower will be clearing leaves efficiently for many seasons to come.
What other DIY leaf blower repairs have you tackled successfully?
Frequently Asked Questions
How do I know what size replacement pull cord I need for my leaf blower?
The best way is to check your leaf blower’s owner’s manual for the recommended cord diameter. If the manual isn’t available, you can carefully measure the diameter of the old cord (if a piece remains) or consult online parts diagrams for your specific leaf blower model. Common sizes are usually between 3.0mm and 4.0mm.
Can I replace the recoil spring if it’s broken or lost tension?
Yes, the recoil spring can be replaced, but it’s a more challenging repair than just the cord. Springs are often sold as part of a complete recoil starter assembly, which can simplify the process. If only the spring is replaced, extreme caution is needed as they are tightly wound and can cause injury if not handled properly.
Why does my new pull cord keep breaking shortly after replacement?
If your new pull cord breaks quickly, several factors could be at play. It might be due to using a cord that’s too thin or made of poor-quality material, incorrect installation causing excessive friction, or an underlying issue with the starter assembly itself, such as a sharp edge on the pulley or housing that’s fraying the cord. Always ensure the cord is properly seated and there are no obstructions.
What tools are essential for replacing a leaf blower pull cord?
Essential tools for replacing a leaf blower pull cord include a screwdriver set (Torx and Phillips), needle-nose pliers, a utility knife or scissors, and a lighter or torch to melt cord ends. A spring clamp is optional but recommended for managing the recoil spring tension.
How can I prevent my leaf blower pull cord from breaking again?
To prevent your leaf blower pull cord from breaking again, use smooth, consistent pulls instead of aggressive yanks, and guide the cord back gently rather than letting it snap. Regularly inspect the cord for fraying, and store the leaf blower so the cord isn’t kinked or pinched.
Is it better to buy a universal pull cord or a specific replacement part?
It is generally better to buy a specific replacement part or a universal cord that matches the exact diameter and length recommended in your leaf blower’s manual. Universal cords can work if they meet the specifications, but an exact fit ensures optimal performance and durability, preventing premature wear.
Frequently Asked Questions
How do I know what size replacement pull cord I need for my leaf blower?
The best way to determine the correct size is to check your leaf blower's owner's manual for the recommended cord diameter. If the manual is unavailable, measure the old cord's diameter (common sizes are between 3.0mm and 4.0mm) or consult online parts diagrams for your specific model.
Can I replace the recoil spring if it's broken or lost tension?
Yes, the recoil spring can be replaced, but it is a more challenging repair than just the cord. Springs are often sold as part of a complete recoil starter assembly, which can simplify the process. If only the spring is replaced, extreme caution is needed as they are tightly wound and can cause injury if not handled properly.
Why does my new pull cord keep breaking shortly after replacement?
If your new pull cord breaks quickly, it could be due to using a cord that's too thin or made of poor-quality material, incorrect installation causing excessive friction, or an underlying issue with the starter assembly itself, such as a sharp edge on the pulley or housing. Always ensure the cord is properly seated and there are no obstructions.
What tools are essential for replacing a leaf blower pull cord?
Essential tools for replacing a leaf blower pull cord include a screwdriver set (Torx and Phillips), needle-nose pliers, a utility knife or scissors, and a lighter or torch to melt cord ends. A spring clamp is optional but recommended for managing the recoil spring tension.
How can I prevent my leaf blower pull cord from breaking again?
To prevent your leaf blower pull cord from breaking again, use smooth, consistent pulls instead of aggressive yanks, and guide the cord back gently rather than letting it snap. Regularly inspect the cord for fraying, and store the leaf blower so the cord isn't kinked or pinched.
Is it better to buy a universal pull cord or a specific replacement part?
It is generally better to buy a specific replacement part or a universal cord that matches the exact diameter and length recommended in your leaf blower's manual. Universal cords can work if they meet the specifications, but an exact fit ensures optimal performance and durability, preventing premature wear.
Get our weekly buyer guide
Practical specs, not advice. Unsubscribe anytime.
The guide was mostly good for replacing the pull cord. I had a bit of a hard time getting the old cord out of the handle, and the utility knife part was a little tricky to get a clean cut. It took me longer than 60 minutes, but I eventually got it done. Next time I’ll probably just buy a whole new recoil assembly if the spring is also an issue.
I’ve always been intimidated by small engine repairs, but my leaf blower’s cord finally gave out. The instructions on understanding the recoil starter assembly were super helpful for me to visualize what I was doing. I was able to get a new 40-inch cord and replace it without too much trouble. It’s working great now, definitely saved me money on a new blower.
This guide was a lifesaver! My old pull cord snapped right before I needed to clear the yard. I followed the steps for replacing it, and it really only took me about 45 minutes, just like it said. Having the right tools, especially the needle-nose pliers, made a huge difference. My leaf blower is back in action and starting smoothly.
Fantastic step-by-step! My gas-powered leaf blower wasn’t starting, and I suspected the cord. This guide confirmed it and walked me through the entire process. The tip about using a lighter to seal the new cord end was something I wouldn’t have thought of, and it made the job much cleaner. Highly recommend this for anyone with a broken cord.