Changing a spark plug on a gas leaf blower is a straightforward DIY task that can significantly improve its reliability and power. This essential maintenance should be performed annually or after approximately 100 hours of use to prevent issues like hard starting, rough running, or loss of power. The process involves locating the old plug, removing it with a spark plug socket, gapping the new plug to manufacturer specifications (typically 0.023 to 0.028 inches for small engines), installing it by hand to prevent cross-threading, and then reattaching the spark plug boot.
When to Consider a Spark Plug Replacement for Your Leaf Blower
Recognizing the signs of a faulty spark plug can save you from unnecessary frustration and downtime with your leaf blower. Several symptoms indicate that it might be time for a replacement. If your blower requires multiple pulls or cranking efforts to start, or if it runs rough, sputters, or misfires during operation, a worn-out spark plug is often the culprit. You might also notice higher fuel consumption than usual or a noticeable loss of blowing power. These issues typically stem from an inconsistent spark, which prevents the engine from combusting fuel efficiently. As a general guideline, it is a good rule of thumb to change the spark plug every season or after approximately 100 hours of use, but always consult your leaf blower’s owner’s manual for specific recommendations tailored to your model.
Essential Tools and Safety Preparations
Before you begin, gathering the right tools and taking essential safety precautions are paramount. This ensures a smooth process and protects you from potential hazards. For expert leaf blower reviews on this site.
To successfully change your leaf blower’s spark plug, you will need:
- A replacement spark plug: Ensure you have the exact type and size recommended for your specific leaf blower model. It’s often best to take the old plug with you when purchasing a new one for comparison.
- Spark plug socket: This specialized socket is designed to grip the spark plug securely without causing damage during removal or installation.
- Socket wrench: To turn the spark plug socket.
- Gap gauge: Used to measure and adjust the gap on the new spark plug to the manufacturer’s specifications.
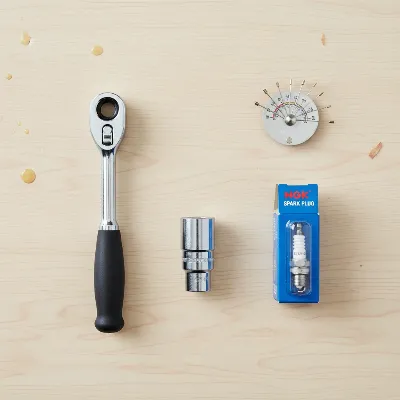 Essential tools for changing a leaf blower spark plug
Safety is always the top priority when working on any power equipment. Always ensure the unit is turned off and that the engine has completely cooled down before you start any work. Working in a well-ventilated area is crucial, especially if you are indoors, to prevent the buildup of exhaust fumes. Wearing insulated work gloves will protect your hands from sharp metal parts and pinching hazards. It is also wise to clear your workspace of any clutter and keep children and pets away from the area to prevent accidents. Never attempt to service the unit while it is running or if the engine is still warm.
Step-by-Step Guide to Replacing Your Leaf Blower’s Spark Plug
Changing your leaf blower’s spark plug is a relatively simple maintenance task that can dramatically improve its performance. Follow these steps carefully to ensure a successful replacement.
Step 1: Locate and Access the Spark Plug
Begin by identifying the spark plug on your leaf blower. It is typically located in the front of the engine. On some models, the spark plug may be in plain view, while others might have a plastic motor cover or cap concealing it. If there is a cover, gently remove it, often by pushing in two retaining tabs on either side and pulling the cover away from the motor. Once the spark plug is visible, locate the spark plug wire boot, which is a rubber cap covering the top of the plug. Grasp the boot firmly with your fingers and pull it straight off the spark plug. You might need to twist it slightly to help release it.
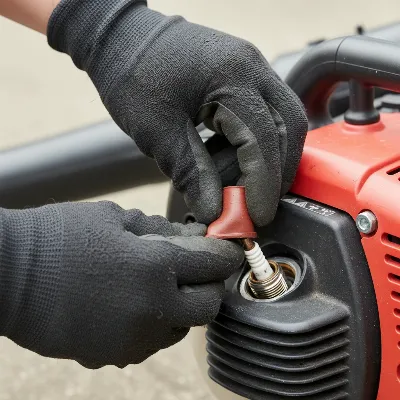 A person removing a spark plug boot from a leaf blower engine
Step 2: Remove the Old Spark Plug
With the boot removed, attach your spark plug socket to the socket wrench and place it over the spark plug. Turn the wrench counterclockwise to loosen the plug. Once it breaks loose, you should be able to unscrew it the rest of the way by hand. Carefully remove the old spark plug from the engine. Take a moment to inspect the removed plug; if it’s covered in heavy soot, shows signs of oil fouling, or has an obviously worn electrode, it confirms your diagnosis. Any severe or unusual damage might warrant a deeper inspection of other components of your blower.
Step 3: Gap the New Spark Plug
Before installing the new spark plug, it’s crucial to ensure it has the correct gap size. The gap is the small space between the metal tip (center electrode) and the curved metal arm (ground electrode) at the end of the plug. Your leaf blower’s manual will specify the recommended gap size for your model. If you don’t have the manual, a common range for small engines is between 0.023 and 0.028 inches, but always prioritize manufacturer specifications. Use a gap gauge by sliding it into the space. If the gap is too small or too large, carefully adjust it by gently bending the outer metal tip until it matches the correct size.
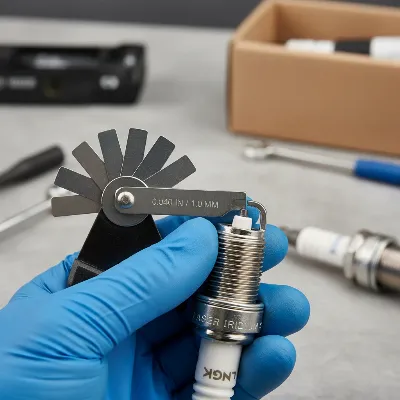 A person using a gap gauge to adjust a spark plug gap for a leaf blower
Step 4: Install the New Spark Plug
With the correct gap set, it’s time to install the new spark plug. Screw the new spark plug into the engine by hand as far as it will go. This critical step helps prevent cross-threading, which can severely damage the threads on the plug or, worse, the engine block. Once it’s hand-tight, use the socket wrench to snug it up, usually an additional half to full turn, depending on the plug type. Be careful not to overtighten it, as too much force can crack the spark plug or make it extremely difficult to remove in the future.
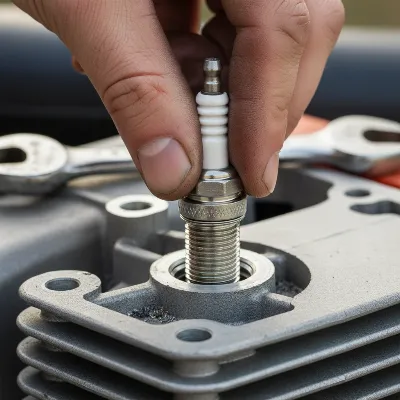 A person hand-threading a new spark plug into a leaf blower engine
Step 5: Reassemble and Test
Finally, push the spark plug wire boot back onto the new spark plug until you feel it snap securely into position. If you removed any covers or caps earlier, replace them, ensuring all locking tabs are securely in place. Once everything is reassembled, start your leaf blower to test its operation. Listen for a smooth, steady engine sound without misfires, sputtering, or excessive vibration. If all sounds well, congratulations, you’ve successfully replaced your spark plug!
Troubleshooting Common Issues After Spark Plug Replacement
While changing a spark plug is typically a straightforward fix, there might be instances where your leaf blower still doesn’t perform optimally afterward. If the leaf blower continues to be hard to start, runs rough, or shows a persistent loss of power, the issue might lie beyond the spark plug. It could indicate problems with the fuel system, such as a clogged carburetor or old fuel, or other ignition components like the ignition coil. In such cases, further diagnosis of the fuel system or seeking professional advice might be necessary. Always refer to your owner’s manual for specific troubleshooting steps and component locations for your particular model.
Conclusion
Replacing the spark plug on your gas leaf blower is a simple yet impactful maintenance task that can restore your equipment’s performance and extend its lifespan. By following these clear, step-by-step instructions and prioritizing safety, you can confidently tackle this DIY repair. Regular spark plug maintenance, along with other routine checks, ensures your leaf blower remains a reliable partner in maintaining a pristine yard. What other small engine maintenance tasks do you find most challenging to keep up with?
Frequently Asked Questions
What happens if I overtighten the spark plug?
Overtightening a spark plug can strip the threads in the engine’s cylinder head, making it difficult to seal the cylinder or remove the plug in the future. It can also crack the spark plug’s ceramic insulator, leading to misfires or complete failure.
How often should I check my leaf blower’s spark plug gap?
It is advisable to check the spark plug gap whenever you replace the plug with a new one to ensure it meets the manufacturer’s specifications. While not always necessary for routine checks on an existing plug, re-gapping can sometimes improve performance if the plug shows wear.
Frequently Asked Questions
How often should a leaf blower spark plug be replaced?
A leaf blower spark plug should be replaced every season or after approximately 100 hours of use. Always consult your leaf blower's owner's manual for specific recommendations tailored to your model to ensure optimal performance and longevity.
What tools are needed to change a leaf blower spark plug?
To change a leaf blower spark plug, you will need a replacement spark plug, a spark plug socket, a socket wrench, and a gap gauge. These tools ensure proper removal, installation, and gapping of the new spark plug to manufacturer specifications.
What are the signs of a bad spark plug in a leaf blower?
Signs of a bad spark plug include difficulty starting (requiring multiple pulls), rough running, sputtering, misfires, increased fuel consumption, or a noticeable loss of blowing power. These symptoms often indicate an inconsistent spark, preventing efficient fuel combustion.
What happens if I overtighten the spark plug?
Overtightening a spark plug can strip the threads in the engine's cylinder head, making it difficult to seal the cylinder or remove the plug in the future. It can also crack the spark plug's ceramic insulator, leading to misfires or complete failure.
How often should I check my leaf blower's spark plug gap?
It is advisable to check the spark plug gap whenever you replace the plug with a new one to ensure it meets the manufacturer's specifications. While not always necessary for routine checks on an existing plug, re-gapping can sometimes improve performance if the plug shows wear.
How to Change a Spark Plug on a Gas Leaf Blower
Follow these steps to replace the spark plug on your gas leaf blower, improving its performance and extending its lifespan.
Identify the spark plug, typically at the front of the engine. Remove any covers and then firmly pull the rubber spark plug wire boot straight off the old spark plug, twisting slightly if needed to release it.
Attach a spark plug socket to a socket wrench and place it over the spark plug. Turn the wrench counterclockwise to loosen and remove the old plug. Inspect the removed plug for soot or wear, which confirms the need for replacement.
Before installation, use a gap gauge to set the new spark plug's gap to the manufacturer's recommended size, usually between 0.023 and 0.028 inches for small engines. Gently bend the outer metal tip to adjust the gap if necessary.
Screw the new spark plug into the engine by hand as far as it will go to prevent cross-threading. Once hand-tight, use the socket wrench to snug it up an additional half to full turn, being careful not to overtighten.
Push the spark plug wire boot back onto the new spark plug until it snaps securely into place. Replace any covers, then start your leaf blower to test its operation, listening for a smooth, steady engine sound.
Get our weekly buyer guide
Practical specs, not advice. Unsubscribe anytime.
I was having such a hard time getting my old Craftsman blower to start, and I almost gave up on it. Following these steps to change the spark plug made a huge difference! It fired right up on the second pull after I put the new one in. Definitely a worthwhile DIY task.
This guide was super helpful for replacing the spark plug on my Ryobi. I always forget about gapping the new plug, so the reminder about the 0.023 to 0.028 inch range for small engines was key. It’s running much smoother now and not bogging down like it used to.
Good info here, especially about preventing cross-threading when installing the new plug. My only minor complaint is that it didn’t specifically mention what type of spark plug socket size to use, which would have saved me a trip back to the garage. Still, my blower is starting better now.
My Echo blower was really struggling with a loss of power, and I suspected the spark plug. The instructions were clear and easy to follow. I replaced it in about 15 minutes, and now it’s back to full strength. Annual maintenance really does pay off!