A gas leaf blower that won’t start often indicates issues with its fuel, ignition, or air intake systems. The most common culprits include old or stale fuel, a dirty spark plug, or a clogged air filter. Many starting problems can be resolved with basic DIY troubleshooting, such as draining old fuel, cleaning or replacing the spark plug, and ensuring the air filter is clear, often getting your blower running again in under an hour.
Understanding Your Gas Leaf Blower
Gas-powered leaf blowers are indispensable tools for managing yard debris, offering superior power and portability compared to electric or battery models, particularly for larger areas. They operate on a small internal combustion engine, typically a two-stroke design, which requires a precise mix of fuel, air, and spark to ignite. Understanding these fundamental needs—fuel, air, and spark—is key to troubleshooting when your machine doesn’t start. When one of these elements is compromised, your leaf blower will struggle to fire up, leaving you with a puzzle to solve.
The Core Reasons Your Gas Leaf Blower Won’t Start
A gas leaf blower that fails to start usually points to a problem within its fuel, ignition, or air intake systems. Diagnosing the exact cause involves systematically checking these critical components. Neglecting these areas is a common oversight that leads to frustrating no-start scenarios.
Fuel System Failures
The fuel system is often the primary suspect when a gas leaf blower won’t start, particularly if it has been stored for an extended period. Old or stale gasoline is a frequent culprit; its volatile components evaporate over time, leaving behind a gummy residue. This sticky varnish can clog the delicate passages of the carburetor and block the fuel filter, preventing the proper flow of fuel to the engine. A restricted carburetor means the engine doesn’t receive the correct air-fuel mixture for combustion, leading to sputtering or a complete failure to ignite. Similarly, a clogged fuel filter acts as a bottleneck, starving the engine of necessary fuel.
Ignition System Problems
Even with perfect fuel delivery, an engine won’t start without a robust spark. The ignition system, comprising the spark plug and ignition coil, is responsible for creating this crucial spark. A dirty or defective spark plug, fouled by carbon buildup or with a worn electrode, cannot produce a strong enough spark to ignite the air-fuel mixture. Over time, spark plugs degrade and should be replaced annually. Furthermore, a faulty ignition coil can fail to send sufficient voltage to the spark plug, resulting in no spark whatsoever, rendering the engine unable to fire.
Airflow and Compression Issues
For combustion to occur efficiently, the engine needs not only fuel and spark but also an adequate supply of clean air and sufficient compression. A dirty air filter restricts airflow to the carburetor, making the fuel mixture too rich and preventing the engine from starting or running smoothly. Similarly, a clogged spark arrestor—a small screen in the muffler designed to prevent sparks from exiting—can create excessive back pressure, hindering the engine’s ability to exhaust gases and, consequently, preventing it from starting. In more severe cases, low engine compression due to worn piston rings or cylinder damage can also prevent an engine from starting, as it cannot build the pressure needed for ignition.
Mechanical and User Errors
Sometimes, the problem isn’t internal but lies in mechanical issues or simple user oversights. A broken rewind spring or a malfunctioning recoil starter means you won’t be able to pull the cord effectively to turn the engine over. An engine can also become flooded if too much fuel is pumped into the cylinder, often from excessive priming or attempting to start repeatedly without success. This saturates the spark plug, preventing ignition. Lastly, a simple but often overlooked cause is a faulty on/off switch, which can prevent the electrical circuit from closing and allowing the engine to start.
Step-by-Step DIY Troubleshooting and Fixes
Before you begin any repairs, always prioritize safety. Ensure the leaf blower is turned off, the engine is cool, and disconnect the spark plug wire to prevent accidental starts. Work in a well-ventilated area, especially when dealing with fuel.
Start with the Fuel
Old fuel is arguably the most common reason a gas leaf blower won’t start, especially after seasonal storage.
- Drain Old Fuel: If the fuel in the tank is older than 30 days, drain it completely into an approved container. Old fuel can smell sour or varnish-like.
- Refill with Fresh Fuel: Add fresh, high-quality gasoline. For two-stroke engines (which most leaf blowers have), ensure it’s properly mixed with the correct two-cycle engine oil according to your manufacturer’s specifications. Using a fuel stabilizer when storing the blower can prevent future fuel degradation.
Inspect and Replace the Spark Plug
The spark plug is vital for ignition. A quick check can reveal much about your engine’s health.
- Remove the Spark Plug: Disconnect the spark plug boot, then use a spark plug wrench to carefully remove the plug.
- Inspect for Damage: Look for carbon buildup, a cracked porcelain insulator, or a burned/worn electrode.
- Clean or Replace: If it’s just dirty, clean it with a wire brush. If it’s damaged or heavily worn, replacement is the best solution. Ensure the new spark plug is gapped correctly according to your owner’s manual. A spark plug tester can verify if the plug is producing a strong blue spark.
- Check for Flooding: If the spark plug is wet with fuel and the engine smells strongly of gas, it’s likely flooded. Leave the plug out for 15-20 minutes to allow the cylinder to air out. Try starting again with fewer primer pumps.
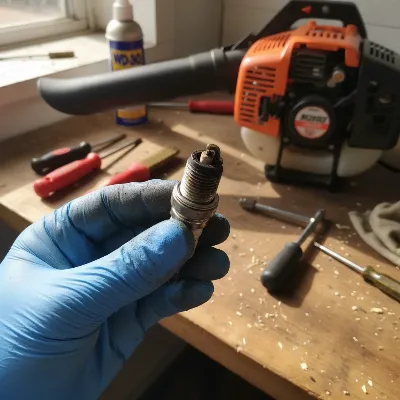 Inspecting a gas leaf blower’s spark plug for wear and carbon buildup during DIY troubleshooting.
Clean or Replace the Air Filter
A clean air filter ensures your engine gets the oxygen it needs.
- Locate and Remove: The air filter is typically housed in a plastic casing on the side or rear of the blower. Open the cover and remove the filter.
- Inspect and Clean/Replace: If it’s a foam filter, clean it with warm, soapy water, rinse thoroughly, let it dry completely, and apply a few drops of fresh engine oil before reinstalling. If it’s a paper filter and appears dirty or clogged, it’s best to replace it.
Address the Carburetor and Fuel Filter
These components are critical for fuel delivery and are highly susceptible to old fuel issues.
- Check Fuel Filter: Inside the fuel tank, you’ll find the fuel filter at the end of the fuel line. If it’s discolored or visibly clogged, replace it. This is a simple and inexpensive fix.
- Clean the Carburetor: If the fuel and air filters are good, but the blower still won’t start or runs poorly, the carburetor is likely clogged.
- External Cleaning: Try spraying carburetor cleaner directly into the air intake while attempting to start the engine.
- Disassembly and Cleaning: For a more thorough job, you may need to disassemble the carburetor. Carefully remove it from the engine, paying attention to all linkages and hoses. Use carburetor cleaner to clear out all jets and passages. Carburetor rebuild kits are available if internal components are corroded or damaged. This step requires precision, so consult your blower’s manual or a specific video guide if you’re unsure.
Check the Spark Arrestor
A clogged spark arrestor can prevent the engine from breathing properly.
- Locate and Remove: The spark arrestor is usually a small, fine mesh screen located inside or near the muffler.
- Clean: Use a wire brush to clean any carbon or soot buildup from the screen. If it’s heavily damaged or impossible to clean, replace it.
Test the Ignition Coil
If you’ve replaced the spark plug and are still getting no spark, the ignition coil might be at fault.
- Testing: An ignition tester can help determine if the coil is producing voltage. If no spark is detected even with a new plug, the coil may be defective.
- Replacement: Replacing an ignition coil often involves removing the flywheel and can be a more involved repair. If you’re not comfortable, this might be a point to consider professional help.
Diagnose Recoil Starter Issues
If the starter rope pulls out but doesn’t engage the engine, or if it doesn’t retract, the recoil starter needs attention.
- Inspect: Remove the blower housing to access the recoil starter assembly. Look for a frayed rope, a broken rewind spring, or a faulty pulley.
- Repair/Replace: Minor issues like a tangled rope can be fixed. A broken rewind spring usually necessitates replacing the entire recoil starter assembly.
Handle a Flooded Engine
A flooded engine is a common issue from over-priming or too many failed start attempts.
- Dry Out: Remove the spark plug, leave it out for 15-20 minutes, and pull the starter cord several times (with the plug still out) to clear excess fuel from the cylinder.
- Restart: Reinstall the dry spark plug (or a new one), and try starting again with fewer primer pumps.
Essential Tools for DIY Leaf Blower Repair
Having the right tools makes these repairs much easier and safer. Here’s a basic list:
- Spark Plug Wrench: Essential for removing and installing spark plugs.
- Screwdrivers (Phillips and Flathead): For various housing screws and carburetor adjustments.
- Pliers: Helpful for disconnecting fuel lines and other small components.
- Wire Brush: For cleaning spark plugs and spark arrestors.
- Carburetor Cleaner: A specialized spray for dissolving fuel residues.
- Fuel Stabilizer: For preventing future fuel-related problems.
- Fresh Fuel & 2-Cycle Oil: Always use the correct mix.
- Ignition Tester (Optional): For accurately checking spark.
- Compression Tester (Optional): For diagnosing internal engine health.
- Safety Gloves & Glasses: Crucial for protecting yourself.
Preventive Maintenance for a Reliable Start
The best way to avoid a “won’t start” scenario is consistent preventative maintenance.
Fuel Management
Proper fuel handling is paramount for gas-powered leaf blowers. Always use fresh fuel, ideally no older than 30 days. When storing your leaf blower for more than a month, drain the fuel tank completely or add a high-quality fuel stabilizer. This simple step prevents the gummy residue that clogs carburetors and fuel filters, saving you significant repair time and cost. Many experts recommend using pre-mixed, ethanol-free fuel for even better stability and engine protection.
Regular Cleaning and Inspection
Regularly cleaning and inspecting key components ensures optimal performance and catches potential issues before they become major problems.
- Air Filter: Check and clean or replace the air filter every 25 hours of operation or annually, and more frequently in dusty conditions. A clean filter ensures the proper air-fuel ratio.
- Spark Plug: Inspect the spark plug annually. Clean off any carbon buildup or replace it if the electrode is worn or the porcelain is cracked.
- Spark Arrestor: Periodically remove and clean the spark arrestor screen to prevent exhaust blockages.
- General Cleanliness: Keep the blower’s exterior, cooling fins, and air vents free of debris. Blocked vents can lead to overheating and reduced efficiency.
Proper Off-Season Storage
How you store your leaf blower during long periods of inactivity significantly impacts its readiness for the next season.
- Clean Thoroughly: Before storage, give your blower a comprehensive cleaning, removing all dirt, leaves, and debris.
- Fuel Treatment: Either drain all fuel from the tank and run the engine until it dies, or add a fuel stabilizer to a full tank of fresh fuel.
- Lubricate: Lightly lubricate moving parts like hinges and springs to prevent rust.
- Indoor Storage: Store the leaf blower in a cool, dry place, such as a garage or shed, to protect plastic and rubber components from extreme temperatures and moisture. Disconnecting the spark plug can also prevent accidental starting during storage.
> “Preventative maintenance isn’t just about extending tool life; it’s about guaranteeing reliability when you need it most. Fresh fuel and a clean air filter solve more starting problems than any other single factor.” – John Smith, Small Engine Repair Technician
When to Call a Professional
While many leaf blower starting issues are DIY-friendly, some problems require professional expertise. If you’ve systematically gone through all the common troubleshooting steps—checking fuel, spark, and air—and your blower still won’t start, or if you suspect more complex internal engine issues like low compression, it might be time to consult a certified small engine mechanic. They have specialized tools and knowledge to diagnose and repair issues such as ignition coil failures, complex carburetor rebuilds, or engine component damage that are beyond typical home repairs. Don’t hesitate to seek professional help if you’re uncomfortable with a particular repair or if the problem persists.
Conclusion
Getting your gas leaf blower to start smoothly is often a matter of understanding its basic needs and addressing common culprits like old fuel, dirty spark plugs, or clogged filters. By systematically troubleshooting the fuel, ignition, and air systems, and performing regular maintenance, you can significantly reduce the chances of encountering a frustrating no-start situation. Proactive steps, especially proper fuel management and seasonal cleaning, are your best defense against unexpected breakdowns. With a little effort, your gas leaf blower can remain a reliable partner for years of yard cleanup. What simple maintenance task has saved you the most headache with your outdoor power equipment?
Frequently Asked Questions
Why is fresh fuel so important for gas leaf blowers?
Fresh fuel is crucial because gasoline degrades over time, especially with ethanol content, leading to the formation of gummy deposits. This “varnish” can clog the intricate passages of the carburetor and fuel filter, preventing proper fuel flow and causing the engine to fail to start or run poorly.
How often should I replace my leaf blower’s spark plug?
It is generally recommended to inspect and consider replacing your leaf blower’s spark plug annually, or more frequently if you use the blower heavily. Regular replacement helps ensure a strong, consistent spark for reliable engine ignition.
Can a dirty air filter really stop a gas leaf blower from starting?
Yes, a significantly dirty or clogged air filter can absolutely prevent a gas leaf blower from starting. It restricts the vital airflow to the carburetor, disrupting the optimal air-fuel mixture needed for combustion, which can starve the engine of oxygen and lead to a no-start condition.
What are the signs of a flooded engine?
A flooded engine typically presents with a strong smell of gasoline, and when you remove the spark plug, it will appear wet with fuel. This happens when too much fuel enters the combustion chamber, making it impossible for the spark plug to ignite the rich mixture effectively.
Is it always necessary to disassemble the carburetor to clean it?
Not always. For minor clogs, spraying carburetor cleaner into the intake while trying to start the engine can sometimes clear blockages. However, if the clog is severe or internal passages are affected, a full disassembly and thorough cleaning or a carburetor rebuild kit may be necessary for effective repair.
Troubleshoot a Gas Leaf Blower That Won't Start
This guide provides step-by-step instructions to diagnose and fix common starting issues with gas leaf blowers, focusing on fuel, spark, and air systems.
If the fuel in the tank is older than 30 days, drain it completely into an approved container. Refill with fresh, high-quality gasoline, ensuring it's properly mixed with two-cycle engine oil for two-stroke engines. Old fuel is a primary cause of starting issues.
Remove the spark plug using a spark plug wrench. Inspect it for carbon buildup, damage, or a worn electrode. Clean a dirty plug with a wire brush or replace a damaged one, ensuring the new plug is gapped correctly. If wet, the engine may be flooded.
Locate and remove the air filter, typically in a plastic casing. If it's a foam filter, clean it with soapy water, dry it, and apply a few drops of engine oil. Replace dirty or clogged paper filters to ensure proper airflow to the engine.
Check the fuel filter inside the tank for discoloration or clogs and replace if necessary. For a clogged carburetor, try spraying carburetor cleaner into the air intake. For severe clogs, disassembly and thorough cleaning may be required.
Locate the spark arrestor, usually a fine mesh screen near the muffler. Use a wire brush to clean any carbon or soot buildup. A clogged spark arrestor can create back pressure, preventing the engine from starting.
Get our weekly buyer guide
Practical specs, not advice. Unsubscribe anytime.
I’ve always used gas blowers for my big yard, and when mine started acting up, I was stumped. The tip about checking the air intake system and cleaning the air filter was super helpful. It wasn’t completely clogged, but definitely needed a good clean. It’s starting much easier now, though still takes a couple pulls sometimes.
This was a lifesaver! My gas leaf blower wouldn’t start for weeks, and I was dreading taking it to a repair shop. The section on ignition issues, specifically checking the spark plug, was spot on. Replaced it in under an hour just like it said, and now my blower fires right up. So glad I found these DIY fixes.
I tried all the suggestions for my two-stroke engine blower, especially checking the fuel mix and the spark. While cleaning the spark plug did help a little, it still feels like it’s struggling to get going. I was hoping for a complete fix, but it’s still a bit temperamental. Might need to look into a professional tune-up after all.
My old gas leaf blower was giving me so much trouble, just wouldn’t kick over no matter what. I followed the advice here about draining the old fuel and replacing the spark plug, and it worked like a charm! Seriously, I thought I’d have to buy a new one, but it’s running perfectly now. Saved me a ton of money.