There’s nothing quite as frustrating as firing up your trusty gas leaf blower only to see a plume of smoke billowing from the exhaust. Not only is it a sign that something is amiss, but it can also be a significant safety concern. When your leaf blower starts smoking, it’s essentially telling you that the engine isn’t burning fuel efficiently or that internal components are overheating. Understanding the cause is the first step toward getting your equipment back in top working order and ensuring your yard remains pristine.
Ignoring a smoking leaf blower can lead to more severe damage and costly repairs down the line. Fortunately, many common smoking issues can be diagnosed and fixed with a few simple DIY steps. As an experienced technician with over a decade of hands-on experience, I’ll guide you through identifying the problem based on the smoke’s color and provide practical, quick fixes to restore your leaf blower’s performance.
Understanding Gas Leaf Blower Smoke: Colors and What They Mean
The color of the smoke emanating from your leaf blower can provide crucial clues about the underlying problem. Just like a car, different smoke hues point to distinct internal issues.
White Smoke
|
Our Picks for the Best Leaf Blower in 2026
As an Amazon Associate I earn from qualifying purchases.
|
||
| Num | Product | Action |
|---|---|---|
| 1 | BLACK + DECKER Electric Leaf Blower, Hand Held Blowers for Lawn Care, Up to 450 CFM and 140 MPH Power, Axial, Lightweight, Corded (BEBL750) |

|
| 2 | WORX 12 Amp Electric Leaf Blower, Turbine Blower for Lawn Care with 600 CFM & 2 Speed Control, Corded, WG520 |
|
| 3 | MZK Cordless Leaf Blower,20V Battery Powered Electric Blower for Lawn Care, Electric Lightweight Leaf Blower for Blowing Leaves, Patio Cleaning and Dust(2 * 2Ah Battery & Charger Included),LF40D13 |
|
| 4 | 20V Handheld Electric Cordless Leaf Blower with 2.0Ah Battery & Fast Charger, Powerful up to 93 MPH, 350 CFM Stepless Speed Control, Powerful for Yard Cleaning |
|
| 5 | 6-Speed Modes Cordless Leaf Blower 21V,200MPH High-Velocity Electric Blower,Lightweight for Dry/Wet Leaves,Lawn Debris,Garage and Driveway Cleaning,Red |
|
| 6 | DEWALT 20V MAX Blower, 100 CFM Airflow, Variable Speed Switch, Includes Trigger Lock, Bare Tool Only (DCE100B) |
|
| 7 | EGO POWER+ Leaf Blower, Cordless Electric 530 CFM, Battery and Charger Not Included - LB5300 |
|
| 8 | WORX Cordless Leaf Blower, Electric Blower with Turbine Fan, Blowers for Lawn Care with 2 Speed Control, Battery & Charger Included, WG547 |
|
| 9 | Electric Leaf Blower Cordless, 21V Battery Powered Blower with 2 x 4.0Ah Battery and Charge, 715CFM &180MPH and 3 Speed Mode, Brushless Handheld Blowers for Lawn Care, Yard, Leaves, Dust, Snow |
|
| 10 | BLACK+DECKER Electric Leaf Blower, Handheld Blowers for Lawn Care, Lightweight, 180 MPH 180 CFM, 7-Amp, Corded (LB700) |
|
White smoke, or sometimes a light grey haze, often indicates the presence of water or an excessively rich fuel mixture. If your leaf blower has been stored in cold, damp conditions, condensed water can enter the engine and create steam as it heats up. This usually dissipates after the engine runs for a few minutes. However, persistent white smoke, especially if thick, can also suggest an incorrect fuel-to-oil ratio with too much oil, or even old, contaminated fuel.
Blue Smoke
Blue smoke is a tell-tale sign that your leaf blower is burning oil. This is a common issue with two-stroke engines that rely on a precise gas-to-oil mix. The most frequent culprit is an incorrect fuel mixture where there’s too much oil, causing it to combust alongside the gasoline. More serious causes for blue smoke can include worn piston rings or cylinder components, allowing engine oil to seep into the combustion chamber.
Black Smoke
If your gas leaf blower is emitting black smoke, it typically means the engine is running too rich – receiving too much fuel or not enough air for proper combustion. This incomplete burning of fuel results in sooty black exhaust. Common causes for black smoke include a clogged air filter, which restricts airflow, or a dirty or improperly adjusted carburetor that’s delivering an excessive amount of fuel to the engine.
Top 5 Reasons Your Gas Leaf Blower Is Smoking
Diagnosing the precise cause of smoke from your leaf blower requires a systematic approach. Here are the five most common reasons you might be seeing smoke, along with how to identify them.
1. Incorrect Fuel Mixture
This is arguably the most common cause of smoke in two-stroke gas leaf blowers. These engines require a specific blend of gasoline and two-cycle oil, often a 40:1 or 50:1 ratio. If you’ve accidentally added too much oil to the mix, or used the wrong type of oil, the excess oil will burn off in the engine, leading to blue or thick white smoke.
- Diagnosis: Check your fuel container. Did you mix it correctly? Is the oil-to-gas ratio as specified in your owner’s manual? If the smoke is blue and accompanied by a strong smell of burning oil, a rich oil mixture is highly probable.
2. Clogged Air Filter
The air filter is crucial for ensuring the engine gets a clean, adequate supply of air. If the air filter becomes clogged with dirt, dust, and debris, it restricts airflow to the carburetor. This imbalance creates a “rich” fuel mixture – too much fuel relative to the air – leading to incomplete combustion and black smoke.
- Diagnosis: Visually inspect your air filter. Is it visibly dirty, greasy, or obstructed? A dark, grimy filter is a strong indicator. You might also notice a decrease in engine power or sputtering when the filter is severely clogged.
3. Dirty or Clogged Carburetor
The carburetor is responsible for mixing air and fuel in precise proportions before it enters the engine. Over time, fuel deposits, varnish, or debris can clog the tiny jets and passages within the carburetor, disrupting this delicate balance. A clogged carburetor can lead to a fuel-rich condition, causing black smoke, rough idling, or difficulty starting the engine.
- Diagnosis: If your blower is emitting black smoke, struggling to maintain a consistent RPM, or running roughly even after checking the air filter, a dirty carburetor is a likely culprit. You might also notice fuel leaks or a strong fuel smell.
4. Worn Piston Rings or Cylinder
This is a more serious mechanical issue where the piston rings, which seal the combustion chamber and regulate oil, become worn or damaged. When this happens, engine oil can leak past the rings into the combustion chamber and burn along with the fuel. This invariably produces consistent blue smoke, often accompanied by a noticeable loss of engine power and potentially increased fuel consumption.
- Diagnosis: Persistent blue smoke, even with a correctly mixed and fresh fuel, is a strong indicator. A compression test can confirm worn piston rings by revealing low engine compression. This issue is less of a “quick fix” and often requires professional attention.
5. Dirty Spark Arrestor
The spark arrestor is a small mesh screen located in the muffler, designed to prevent hot carbon particles from exiting the exhaust and potentially starting fires. Over time, carbon deposits from combustion can accumulate and clog this screen. A restricted spark arrestor creates back pressure in the exhaust system, hindering the engine’s ability to expel gases properly. This can lead to inefficient burning, overheating, and smoke, often light grey or black.
- Diagnosis: If you observe smoke and feel reduced power, check the muffler outlet. Carbon buildup on the spark arrestor screen will be visible, or the screen may appear completely blocked.
5 Quick DIY Fixes for a Smoking Gas Leaf Blower
Before you consider taking your leaf blower to a repair shop, try these practical and quick DIY fixes that address the most common causes of smoking. Always ensure the engine is off and cool, and the spark plug wire is disconnected for safety before beginning any maintenance.
1. Correct Your Fuel Mixture
If you suspect an incorrect fuel mixture, the solution is straightforward.
- Step-by-Step:
- Drain the tank: Safely drain all existing fuel from the leaf blower’s tank into an approved container. Dispose of the old fuel according to local regulations.
- Mix fresh fuel: Prepare a new batch of fuel using fresh gasoline and the correct two-cycle engine oil, adhering precisely to the manufacturer’s recommended ratio (e.g., 50:1 or 40:1). Use a dedicated measuring container for accuracy.
- Refill and test: Pour the new, correctly mixed fuel into the tank and restart your leaf blower. The smoke should clear as the old mixture burns off.
> “Using the right fuel mix is the single most important maintenance step for a 2-stroke engine. It prevents unnecessary wear and, most commonly, smoking issues.” – Alex Nguyen, Lead Technician at ReviewTuTam.com
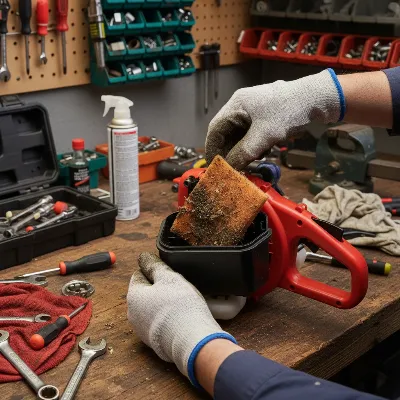
2. Clean or Replace the Air Filter
A clean air filter is essential for optimal engine performance and preventing black smoke.
- Step-by-Step:
- Locate and remove: Find the air filter housing, usually a plastic cover on the side of the engine, and remove it. Take out the air filter element.
- Inspect and clean: If it’s a foam filter, wash it gently with warm, soapy water, rinse thoroughly, and let it air dry completely. For paper filters, tap out loose dirt or use compressed air (blown from the inside out). If the filter is heavily soiled, damaged, or brittle, replace it with a new one.
- Reassemble: Once clean and dry (or replaced), reinsert the filter and secure the housing cover.
 A person cleaning a dirty air filter from a gas leaf blower, showing accumulated dust and debris.
3. Clean the Spark Arrestor
Clearing a clogged spark arrestor can quickly resolve exhaust restriction issues.
- Step-by-Step:
- Locate muffler: Identify the muffler, typically a metal housing with an exhaust port. The spark arrestor screen is usually found near or inside this port. Consult your manual if unsure.
- Remove screen: Carefully remove the small mesh screen, often held in place by a screw or clip.
- Clean deposits: Use a wire brush to scrub away carbon deposits from the screen. For stubborn buildup, you can soak the screen in carburetor cleaner for 10-15 minutes, then brush it again.
- Reinstall: Ensure the screen is completely dry and free of debris, then reinstall it securely in the muffler.
4. Inspect and Replace Spark Plug
A fouled spark plug can lead to incomplete combustion and smoke.
- Step-by-Step:
- Remove spark plug: Disconnect the spark plug boot and use a spark plug wrench to carefully unscrew and remove the spark plug.
- Inspect condition: Examine the electrode and insulator. Look for carbon buildup, oil fouling, or signs of wear. A black, sooty, or oily appearance indicates an issue.
- Clean or replace: If mildly fouled, you can gently clean carbon deposits with a wire brush. However, it’s often best to replace a dirty or old spark plug with a new one of the correct type, ensuring it’s properly gapped according to your manual.
- Reinstall: Screw in the new or cleaned spark plug by hand to avoid cross-threading, then tighten it with a wrench. Reattach the spark plug boot.
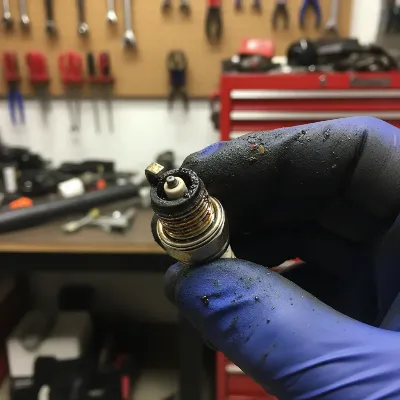 Close-up of a person inspecting a spark plug from a gas leaf blower for signs of wear and carbon buildup.
5. Clean the Carburetor
A dirty carburetor is a common cause for black smoke and rough running.
- Step-by-Step:
- Access carburetor: Remove the air filter housing and any other components blocking access to the carburetor.
- Disassemble (carefully): Using appropriate tools, carefully remove the carburetor. Take photos as you go to aid reassembly. Remove the fuel bowl (if applicable) and identify the main jet and idle jet.
- Clean with carburetor cleaner: Spray carburetor cleaner into all small openings, jets, and passages. Use a thin wire or a carburetor cleaning kit to poke through any blockages. Pay close attention to the tiny holes in the jets.
- Reassemble: Allow the cleaner to evaporate completely, then reassemble the carburetor and reinstall it on the engine. If issues persist or you are uncomfortable with disassembly, professional help may be needed.
When to Seek Professional Help
While many smoking issues can be resolved with DIY efforts, some problems require the expertise of a professional technician. If you’ve tried the quick fixes above and your gas leaf blower continues to smoke, or if you observe any of the following, it’s time to visit a service center:
- Persistent Blue Smoke: If blue smoke continues even after using the correct fuel mixture and the engine shows signs of low compression, it likely points to worn piston rings or cylinder damage, which are complex repairs.
- Major Fuel Leaks: Any significant or persistent fuel leaks that you cannot easily fix can be a fire hazard and should be addressed by a professional.
- Engine Knocking or Strange Noises: Unusual mechanical sounds accompanying the smoke could indicate serious internal engine damage.
- Carburetor Beyond Simple Cleaning: If cleaning doesn’t resolve carburetor issues, it might need a rebuild kit or complete replacement, which can be intricate for an inexperienced user.
- Uncertainty or Discomfort: If you’re unsure about any step or uncomfortable performing a repair, it’s always safer to consult a qualified mechanic.
Conclusion
A smoking gas leaf blower is a clear signal that your equipment needs attention, but it doesn’t always spell disaster. By understanding the meaning behind different smoke colors—white for water or rich fuel, blue for burning oil, and black for excess fuel—you can quickly narrow down the potential causes. Often, simple adjustments like correcting your fuel mixture, cleaning the air filter or spark arrestor, or replacing a spark plug can solve the problem and get your gas leaf blower running smoothly again.
Regular maintenance is key to preventing these issues and extending the life of your leaf blower. Don’t let a puff of smoke derail your yard work. With a little troubleshooting and these quick DIY fixes, you can often restore your machine to peak performance. What kind of smoke have you noticed from your leaf blower, and which of these fixes are you planning to try first?
Câu Hỏi Thường Gặp
How often should I check my gas leaf blower’s fuel mixture?
You should mix fuel fresh each time you fill your tank, following the manufacturer’s specified gas-to-oil ratio precisely. It’s best practice to avoid storing mixed fuel for extended periods (more than a few weeks) as it can degrade and cause engine issues, including smoking. Always use fresh, high-quality fuel and oil.
Can old gas cause my leaf blower to smoke?
Yes, absolutely. Old or stale gasoline can degrade and separate, leading to inefficient combustion and potentially causing white or light grey smoke. It might also contain moisture. Always drain old fuel and replace it with fresh, correctly mixed fuel for optimal performance and to prevent smoking.
Is white smoke always a serious problem for a gas leaf blower?
Not necessarily. While white smoke can indicate a rich fuel mixture or even burning oil, it can also simply be steam from condensed water in the engine, especially if the leaf blower has been stored in cold or damp conditions. If it quickly dissipates after the engine warms up, it’s usually not a serious concern. Persistent white smoke, however, warrants further investigation.
How often should I clean my leaf blower’s air filter?
The frequency depends on how often you use your Leaf Blower and the conditions you operate it in. For regular use in dusty or dirty environments, check and clean your air filter monthly or even more frequently. For lighter use, inspecting it at the start of each season and after every 10-15 hours of operation is a good general guideline. A clean filter ensures proper airflow and prevents smoke.