As the vibrant colors of autumn fade and winter’s chill approaches, your trusty gas leaf blower often gets relegated to the shed, forgotten until spring. However, neglecting proper winterization can lead to frustrating starting issues, costly repairs, and a significantly shortened lifespan for your equipment. Taking a few simple, DIY steps now ensures your leaf blower remains in peak condition, ready to tackle next season’s yard work with ease. This comprehensive guide will walk you through the essential process of preparing your gas leaf blower for its dormant season, transforming a potential headache into a smooth start next year.
Understanding Your Gas Leaf Blower for Winter Prep
Gas leaf blowers are indispensable tools for maintaining a pristine yard, efficiently clearing leaves, debris, and even light snow. They come in various forms, from handheld models to powerful backpack units, most commonly powered by a small gasoline engine. While the core function is simple – generating a powerful stream of air – the internal combustion engine requires specific care, especially before prolonged periods of inactivity during winter.
The primary reason for winterizing is to prevent fuel degradation and internal engine corrosion. Modern gasoline, particularly ethanol-blended fuels, can degrade rapidly, separating and forming gummy deposits that clog carburetors and fuel lines. Cold temperatures and moisture can also lead to rust and other damage inside the engine. By properly preparing your leaf blower, you safeguard its vital components against these seasonal threats, ensuring reliability and extending its operational life. Most leaf blowers use two-stroke engines, which mix oil directly with fuel, simplifying oil changes compared to four-stroke engines.
Essential Tools and Materials for Winterizing
Before you begin the winterization process, gather all the necessary tools and materials. Having everything on hand will make the task smoother and more efficient.
Here’s a checklist of what you’ll need:
- Safety Gear: Safety glasses and work gloves are paramount to protect your eyes and hands from fuel, oil, and debris.
- Fuel Stabilizer: A high-quality fuel stabilizer, especially one designed for ethanol-blended fuels, is crucial if you choose to keep fuel in the tank.
- New Spark Plug: A fresh spark plug ensures reliable ignition when you restart the blower. Consult your owner’s manual for the correct type.
- Spark Plug Wrench: Essential for safely removing and installing the spark plug.
- 2-Cycle Engine Oil (or Fogging Oil): For two-stroke engines, a small amount of 2-cycle oil is used to lubricate the cylinder for storage. Fogging oil is a broader option for small engines.
- New Air Filter: A clean air filter is vital for engine performance. Replace it annually or as needed.
- New Fuel Filter: If your leaf blower has an in-tank fuel filter, consider replacing it to prevent clogs.
- Clean Rags and Brushes: For thoroughly cleaning the exterior and engine components.
- Oil Drain Pan and Funnel (Optional): If you opt to drain the fuel or for 4-stroke oil changes.
- Torque Wrench (Optional but Recommended): For tightening the spark plug to the manufacturer’s specifications.
- Compressed Air (Optional): For clearing stubborn debris from cooling fins and air filter housings.
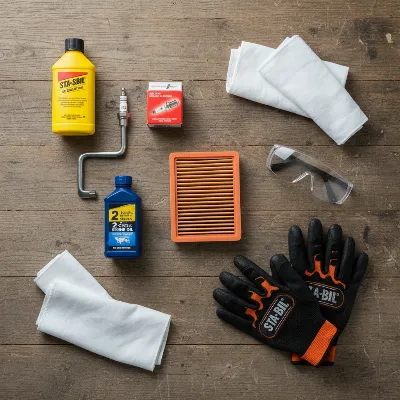 Essential tools and materials for safely winterizing a gas leaf blower at home.
Step-by-Step Guide to Winterizing Your Gas Leaf Blower
Proper winterization is a multi-step process that addresses different aspects of your leaf blower’s operation and storage. Following these steps diligently will ensure your equipment is well-protected.
Fuel System Preparation: Drain or Stabilize
|
Our Picks for the Best Leaf Blower in 2026
As an Amazon Associate I earn from qualifying purchases.
|
||
| Num | Product | Action |
|---|---|---|
| 1 | EGO POWER+ Leaf Blower, Cordless Electric 530 CFM, Battery and Charger Not Included - LB5300 |

|
| 2 | BLACK+DECKER Electric Leaf Blower, Handheld Blowers for Lawn Care, Lightweight, 180 MPH 180 CFM, 7-Amp, Corded (LB700) |
|
| 3 | 6-Speed Modes Cordless Leaf Blower 21V,200MPH High-Velocity Electric Blower,Lightweight for Dry/Wet Leaves,Lawn Debris,Garage and Driveway Cleaning,Red |
|
| 4 | DEWALT 20V MAX Blower, 100 CFM Airflow, Variable Speed Switch, Includes Trigger Lock, Bare Tool Only (DCE100B) |
|
| 5 | WORX Cordless Leaf Blower, Electric Blower with Turbine Fan, Blowers for Lawn Care with 2 Speed Control, Battery & Charger Included, WG547 |
|
| 6 | WORX 12 Amp Electric Leaf Blower, Turbine Blower for Lawn Care with 600 CFM & 2 Speed Control, Corded, WG520 |
|
| 7 | 20V Handheld Electric Cordless Leaf Blower with 2.0Ah Battery & Fast Charger, Powerful up to 93 MPH, 350 CFM Stepless Speed Control, Powerful for Yard Cleaning |
|
| 8 | Electric Leaf Blower Cordless, 21V Battery Powered Blower with 2 x 4.0Ah Battery and Charge, 715CFM &180MPH and 3 Speed Mode, Brushless Handheld Blowers for Lawn Care, Yard, Leaves, Dust, Snow |
|
| 9 | BLACK + DECKER Electric Leaf Blower, Hand Held Blowers for Lawn Care, Up to 450 CFM and 140 MPH Power, Axial, Lightweight, Corded (BEBL750) |
|
| 10 | MZK Cordless Leaf Blower,20V Battery Powered Electric Blower for Lawn Care, Electric Lightweight Leaf Blower for Blowing Leaves, Patio Cleaning and Dust(2 * 2Ah Battery & Charger Included),LF40D13 |
|
The fuel system is often the most vulnerable part of a gas leaf blower during storage. Stale fuel can lead to severe engine problems. You have two main options:
Option 1: Draining Fuel Completely
This is often considered the safest method to prevent fuel-related issues. First, use a siphon pump or turkey baster to remove as much fuel as possible from the tank into an approved container. Next, start the engine and let it run until it completely runs out of fuel and stalls. This ensures the carburetor and fuel lines are empty. Repeat this step once more with any residual fuel until the engine no longer starts. Dispose of old fuel responsibly at a local recycling center.
Option 2: Using Fuel Stabilizer
If you prefer to leave fuel in the tank, a high-quality fuel stabilizer is essential. Add the recommended amount of stabilizer to a full tank of fresh, non-ethanol gasoline (if available, otherwise use your usual blend) according to the product’s instructions. Run the leaf blower for 5-10 minutes to ensure the stabilized fuel circulates throughout the entire fuel system, including the carburetor. This prevents varnish and gum deposits from forming.
“Always prioritize using fresh, non-ethanol fuel for your small engines, especially during winterization. Ethanol can attract moisture and corrode fuel system components over time.” – John Davis, Small Engine Repair Technician
Engine Protection: Spark Plug and Cylinder Care
Protecting the engine’s internal components from rust and corrosion is critical. Start by disconnecting the spark plug wire to prevent accidental starting. Then, use a spark plug wrench to carefully remove the spark plug. Pour approximately one teaspoon of clean 2-cycle engine oil (for 2-stroke engines) or dedicated fogging oil directly into the spark plug opening. Slowly pull the starter rope 8-10 times to distribute the oil evenly across the cylinder walls, protecting them from rust. Finally, install a new spark plug, tightening it to the manufacturer’s specified torque. If your leaf blower is a rare 4-stroke model, you should also drain and replace the engine oil before this step, following the manufacturer’s guidelines.
Air and Fuel Filter Maintenance
Clean filters are vital for efficient operation. Locate your air filter, typically housed in a plastic case on the side of the engine. Remove it and inspect its condition. If it’s merely dusty, gently clean it with compressed air or tap out the debris. If it’s excessively dirty, torn, or clogged, replace it with a new one. Similarly, if your leaf blower has an in-tank fuel filter (often a small screen on the end of the fuel line inside the tank), inspect it. If it appears clogged or dirty, replace it to ensure a clean fuel supply next season.
Thorough Cleaning and Inspection
A clean leaf blower is a happy leaf blower. Use a stiff brush, rags, and possibly compressed air to thoroughly clean the exterior of the machine. Remove all traces of dirt, dust, grass clippings, and sap from the housing, fan blades, and cooling fins. Debris left on the machine can absorb moisture and lead to rust or even provide shelter for pests. Once clean, lightly oil any external metal surfaces, such as screws, bolts, and levers, to prevent rust. Finally, take a moment to inspect the entire unit for any loose fasteners, cracked hoses, damaged cables, or worn parts. Replace or repair anything that looks suspect now, rather than discovering an issue when you need the blower in spring.
 A person thoroughly cleaning and inspecting a gas leaf blower for winter storage.
Proper Storage Location
The final step is to store your winterized leaf blower in an appropriate location. Choose a clean, dry, and well-ventilated area, such as a garage, shed, or basement. Avoid storing it outdoors where it will be exposed to extreme temperature fluctuations, direct sunlight, rain, or snow. Ensure the area is free from excessive humidity. Ideally, store the leaf blower in an upright position or as recommended by the manufacturer to prevent any residual fluids from leaking. Keep it away from heat sources and open flames, and out of reach of children and pets.
Common Winterizing Mistakes to Avoid
Even with the best intentions, some common mistakes can undermine your winterization efforts. Being aware of these pitfalls can save you time and frustration.
One of the most frequent errors is leaving old, untreated fuel in the tank. Untreated gasoline, especially with ethanol, can degrade and form sticky deposits that clog the carburetor and fuel lines, making it extremely difficult to start the blower in the spring. Another mistake is skipping the cylinder lubrication step. Without adding oil to the cylinder, internal metal components can rust over the long storage period, leading to premature engine wear. Many users also neglect a thorough cleaning, allowing dirt and debris to accumulate and potentially cause rust or attract pests. Finally, improper storage, such as leaving the leaf blower outside or in a damp area, can expose it to harsh elements, negating all your hard work. Always ensure your storage spot is dry, protected, and stable.
Benefits of Proper Leaf Blower Winterization
Investing a little time in winterizing your gas leaf blower yields significant long-term benefits that far outweigh the effort.
Firstly, it significantly extends the lifespan of your equipment. By preventing fuel degradation, rust, and corrosion, you protect the engine’s vital components from wear and tear that can occur during inactivity. Secondly, it ensures easy starting and reliable performance next spring. You won’t be left struggling with a reluctant engine when you need it most, saving you valuable time and effort. This preventive maintenance also saves you money on costly repairs. Addressing potential issues now, or preventing them altogether, is much cheaper than taking your blower to a repair shop for carburetor cleaning or engine work. Ultimately, a properly winterized leaf blower maintains its efficiency and power, ready to perform at its best season after season.
Conclusion
Winterizing your gas leaf blower is a straightforward DIY task that pays dividends in longevity, reliability, and peace of mind. By diligently draining or stabilizing fuel, protecting the engine’s internals, maintaining filters, cleaning the unit thoroughly, and storing it properly, you safeguard your investment against the harsh realities of off-season neglect. These steps not only prevent common issues like difficult starting and premature wear but also ensure your equipment is always ready for peak performance when spring arrives. Don’t let your valuable yard tool fall victim to winter’s toll—take the time now to prepare it for a fresh start next season. What other seasonal maintenance tasks do you tackle to ensure your tools last longer?
Frequently Asked Questions
Why is winterizing my gas leaf blower so important?
Winterizing prevents stale fuel from damaging the carburetor and fuel lines, protects internal engine components from rust and corrosion, and ensures your leaf blower starts easily and runs efficiently when you need it again in the spring, saving you time and costly repairs.
Should I drain the fuel or use a stabilizer?
Both methods are effective. Draining the fuel completely eliminates any risk of fuel degradation. Using a fuel stabilizer with fresh, non-ethanol gasoline protects the fuel system by preventing varnish and gum formation if you prefer to leave fuel in the tank.
How often should I replace the spark plug and air filter?
It’s generally recommended to replace the spark plug and clean or replace the air filter annually, especially as part of your winterization routine. This ensures optimal engine performance and easier starting.
Can I use regular car engine oil for cylinder lubrication?
No, for two-stroke leaf blowers, you should use 2-cycle engine oil or a dedicated fogging oil for cylinder lubrication. Regular car engine oil is designed for four-stroke engines and is not suitable for this purpose in a two-stroke engine.
Where is the best place to store my winterized leaf blower?
Store your Leaf Blower in a clean, dry, and climate-controlled environment, such as a garage, shed, or basement. Avoid areas with extreme temperature fluctuations, high humidity, or direct exposure to the elements to prevent damage and corrosion.