There’s nothing quite as frustrating as pulling the starter cord on your leaf blower, only for it to sputter, cough, or refuse to start entirely. Often, the hidden culprit behind these performance woes is a dirty or clogged carburetor. This vital component ensures your engine receives the perfect mix of fuel and air, and when it’s compromised, your blower simply can’t perform its best. Don’t let a sluggish leaf blower derail your yard work. This comprehensive guide will walk you through the DIY process of quickly and effectively cleaning your leaf blower’s carburetor, restoring its power and efficiency, and providing tips to prevent future issues.
Understanding Your Leaf Blower’s Carburetor
The carburetor is a small but mighty part of your leaf blower’s engine, acting as its “lungs” and “mouth.” Its primary function is to mix gasoline with air in precisely the right ratio before this mixture is sent to the engine for combustion. This delicate balance is critical for smooth starting, consistent idling, and strong power output.
However, carburetors are particularly susceptible to clogging and buildup. The most common cause is stale or bad fuel, especially modern gasoline containing ethanol. Ethanol attracts moisture, which can lead to rust and, more importantly, leaves behind sticky varnish and gum deposits as it evaporates. These residues can quickly obstruct the carburetor’s tiny jets and passages, starving the engine of fuel. Additionally, a clogged fuel filter can prevent clean fuel from reaching the carburetor, while a dirty air filter can restrict airflow, leading to an overly rich fuel mixture that further compounds the problem.
Symptoms of a Clogged Leaf Blower Carburetor
Identifying the signs of a dirty carburetor early can save you time and frustration. If your leaf blower is exhibiting any of the following symptoms, it’s likely time for a carburetor cleaning:
- Hard Starting: The blower requires multiple pulls of the starter cord or simply won’t fire up.
- Rough Idling: The engine runs erratically, struggles to maintain a steady RPM, or stalls frequently when not under load.
- Loss of Power: You notice a significant decrease in blowing force, and the engine sounds weak or “tired.”
- Stalling During Operation: The blower runs for a short period, then suddenly shuts off, especially when accelerating or under heavy use.
- Won’t Rev Up: The engine starts but refuses to reach its maximum RPM, making it ineffective for clearing leaves.
- Excessive Smoke: A tell-tale sign of an improper air-fuel mixture, often indicating a rich condition caused by restricted airflow or clogged fuel passages.
> “Many leaf blower issues stem from fuel problems. Old fuel can quickly gum up a carburetor’s tiny passages, leading to performance headaches that are often preventable with proper fuel management.” – John Smith, Small Engine Specialist
Essential Tools and Safety Precautions
Before you begin, gathering the right tools and observing strict safety measures are paramount. Working with fuel and small engine components requires attention to detail and a cautious approach.
Tools You’ll Need:
- Screwdrivers: Flathead and Phillips, various sizes (Torx bits may also be needed for some models).
- Wrenches/Socket Set: For detaching the carburetor mounting bolts.
- Needle-Nose Pliers: Useful for disconnecting fuel lines and linkages.
- Carburetor Cleaner Spray: Specifically designed to dissolve gum and varnish. Ensure it’s safe for rubber seals and gaskets.
- Clean Rags/Shop Towels: For wiping down components and catching spills.
- Small Brush/Old Toothbrush: To scrub away stubborn deposits.
- Thin Wire/Needle: For clearing tiny jets and passages (e.g., from a welding torch tip cleaner set).
- Compressed Air: An air compressor or canned air to blow out passages.
- Container: A small bucket or pan to catch fuel when draining the tank and for cleaning components.
Safety Precautions:
- Work in a Well-Ventilated Area: Carburetor cleaner fumes can be strong and harmful.
- Ensure the Engine is Cool: Never work on a hot engine.
- Disconnect the Spark Plug Wire: This prevents accidental starting.
- Wear Safety Glasses and Gloves: Protect your eyes from sprays and hands from chemicals.
- Have a Fire Extinguisher Nearby: Always be prepared when working with gasoline.
- Note Component Placement: Take photos or make diagrams during disassembly to aid reassembly. Small parts are easily lost.
Step-by-Step Guide to Cleaning Your Leaf Blower Carburetor
Cleaning a leaf blower carburetor is a DIY task that most homeowners can tackle with patience and the right approach. Follow these steps carefully to ensure a thorough cleaning and successful reassembly.
Preparation and Disassembly
|
Our Picks for the Best Leaf Blower in 2026
As an Amazon Associate I earn from qualifying purchases.
|
||
| Num | Product | Action |
|---|---|---|
| 1 | 20V Handheld Electric Cordless Leaf Blower with 2.0Ah Battery & Fast Charger, Powerful up to 93 MPH, 350 CFM Stepless Speed Control, Powerful for Yard Cleaning |

|
| 2 | Electric Leaf Blower Cordless, 21V Battery Powered Blower with 2 x 4.0Ah Battery and Charge, 715CFM &180MPH and 3 Speed Mode, Brushless Handheld Blowers for Lawn Care, Yard, Leaves, Dust, Snow |
|
| 3 | DEWALT 20V MAX Blower, 100 CFM Airflow, Variable Speed Switch, Includes Trigger Lock, Bare Tool Only (DCE100B) |
|
| 4 | 6-Speed Modes Cordless Leaf Blower 21V,200MPH High-Velocity Electric Blower,Lightweight for Dry/Wet Leaves,Lawn Debris,Garage and Driveway Cleaning,Red |
|
| 5 | BLACK + DECKER Electric Leaf Blower, Hand Held Blowers for Lawn Care, Up to 450 CFM and 140 MPH Power, Axial, Lightweight, Corded (BEBL750) |
|
| 6 | WORX 12 Amp Electric Leaf Blower, Turbine Blower for Lawn Care with 600 CFM & 2 Speed Control, Corded, WG520 |
|
| 7 | WORX Cordless Leaf Blower, Electric Blower with Turbine Fan, Blowers for Lawn Care with 2 Speed Control, Battery & Charger Included, WG547 |
|
| 8 | BLACK+DECKER Electric Leaf Blower, Handheld Blowers for Lawn Care, Lightweight, 180 MPH 180 CFM, 7-Amp, Corded (LB700) |
|
| 9 | EGO POWER+ Leaf Blower, Cordless Electric 530 CFM, Battery and Charger Not Included - LB5300 |
|
| 10 | MZK Cordless Leaf Blower,20V Battery Powered Electric Blower for Lawn Care, Electric Lightweight Leaf Blower for Blowing Leaves, Patio Cleaning and Dust(2 * 2Ah Battery & Charger Included),LF40D13 |
|
The journey to a clean carburetor begins with safely preparing your leaf blower and carefully removing the carburetor from the engine.
- Drain the Fuel Tank: Before doing anything else, ensure the fuel tank is empty. If the fuel is old, dispose of it properly. If you plan to store the blower for a long time, it is always a good idea to drain the fuel or add a fuel stabilizer to prevent future clogs.
- Clean the Exterior: Use a brush or compressed air to clean any dirt or debris from the outside of the engine, especially around the air filter housing. This prevents foreign particles from entering the carburetor during disassembly.
- Remove the Air Filter Assembly: Locate the air filter cover and remove it. Take out the air filter. Inspect it for dirt or damage; clean or replace it if necessary.
- Locate the Carburetor: The carburetor is typically situated behind the air filter.
- Detach the Carburetor: Using your screwdrivers and wrenches, remove the screws or nuts that secure the carburetor to the engine.
- Disconnect Fuel Lines and Linkages: Carefully disconnect the fuel lines (usually two: supply and return/primer bulb) and the throttle and choke linkages. Pay close attention to how they are attached, perhaps taking photos, as they must be reconnected precisely in their original positions. Be ready for some fuel to leak when disconnecting the lines.
- Disassemble the Carburetor (Carefully): Place the carburetor on a clean work surface. Remove the float bowl (if present) or the diaphragm cover plates, which are usually held by small Phillips screws. Gently remove any diaphragms, gaskets, and internal components like the float, needle valve, and jets. Keep all small parts organized – a magnetic tray or labeled compartments can be very helpful. Remember that designs vary, so consult your blower’s manual if unsure.
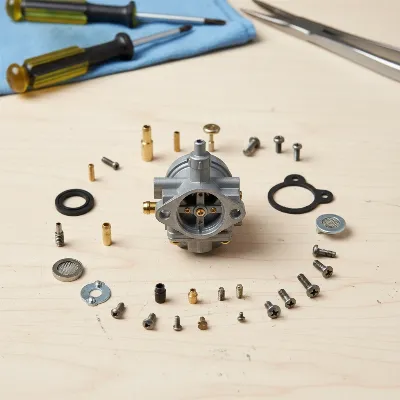 Close-up of a disassembled leaf blower carburetor on a clean workbench with various small parts organized, highlighting the intricate components ready for cleaning.
Deep Cleaning the Carburetor Components
With the carburetor disassembled, you can now thoroughly clean its internal passages and components. This is where most clogs are found and addressed.
- Spray Carburetor Cleaner: Generously spray carburetor cleaner into all openings, jets, and internal passages of the carburetor body. Focus on areas with visible varnish or gum buildup. Be thorough, but avoid spraying directly onto rubber seals or gaskets unless your cleaner explicitly states it’s safe for them, as some cleaners can cause damage.
- Scrub Away Buildup: Use a small brush or an old toothbrush to scrub away any stubborn grime or varnish from the carburetor body and other metal components.
- Clear Clogs in Jets and Passages: The tiny jets are often the most problematic areas. Use a thin wire or needle from a torch tip cleaning set to gently push through all the small holes and passages, ensuring they are free of debris. Be extremely careful not to enlarge or damage these critical orifices, as this can affect fuel metering and engine performance.
- Clean Internal Screens and Diaphragms: Inspect any internal screens (fuel filters) for clogs and clean them with carburetor cleaner and a brush. If diaphragms appear stiff, cracked, or damaged, they will need to be replaced, often as part of a carburetor rebuild kit.
- Blow with Compressed Air: Once you’ve sprayed and brushed, use compressed air to blow out all passages, jets, and openings. This helps to remove any loosened debris and ensures complete dryness. Wear safety glasses to protect your eyes from any propelled cleaner or dirt.
- Wipe Down: Use a clean rag to wipe down all cleaned parts and allow them to air dry completely before reassembly.
Reassembly and Reinstallation
The final stage involves putting everything back together and reinstalling the carburetor, ensuring all connections are secure.
- Reassemble the Carburetor: Carefully reassemble the carburetor, reversing the disassembly steps. Refer to your photos or diagrams to ensure all small parts, gaskets, and diaphragms are installed in their correct positions. Tighten screws snugly but avoid overtightening, which can strip threads or damage components.
- Reinstall the Carburetor: Position the reassembled carburetor back onto the engine. Reconnect the throttle and choke linkages, ensuring they move freely and operate correctly.
- Reconnect Fuel Lines: Attach the fuel lines securely to their respective nipples on the carburetor. Double-check for proper connection to prevent leaks.
- Replace Air Filter Assembly: Reinstall the air filter and its cover.
- Reconnect Spark Plug Wire: Reattach the spark plug wire.
- Refill with Fresh Fuel: Fill the fuel tank with fresh, properly mixed fuel (if it’s a 2-cycle engine). Prime the carburetor if your blower has a primer bulb until fuel is visible.
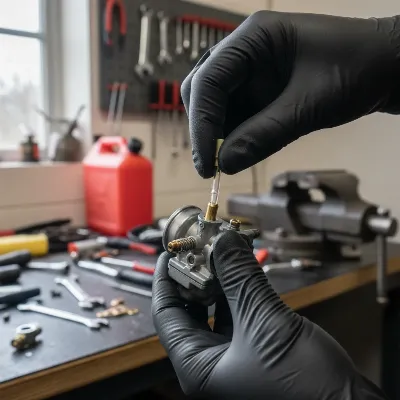 Close-up of a hand reassembling a leaf blower carburetor, demonstrating the meticulous process of reconnecting fuel lines and linkages after cleaning.
Adjusting Your Carburetor After Cleaning
After a thorough cleaning and reinstallation, your leaf blower’s carburetor might need minor adjustments to run optimally. Many carburetors on small engines have adjustment screws, often labeled “L” for low speed/idle mixture and “H” for high speed mixture. Some newer models may have limiter caps that restrict adjustment or require special tools.
- Consult Your Manual: Always refer to your specific leaf blower’s owner’s manual for the precise adjustment procedures and recommended settings.
- Idle Speed: The idle screw (sometimes not explicitly labeled L or H but a separate adjustment) controls the engine’s idle RPM.
- Low-Speed Mixture (L Screw): Affects starting and idle performance. Adjusting it too lean can cause stalling, while too rich can cause bogging.
- High-Speed Mixture (H Screw): Controls the fuel mixture at full throttle. Adjusting it too lean can damage the engine, while too rich can cause a lack of power and excessive smoke.
Generally, you’ll start the engine and let it warm up. For the high-speed screw, slowly turn it in until the engine “four-strokes” (makes a rough, popping sound), then back it out slowly until the engine runs smoothly at its highest RPM. For the low-speed screw, aim for a smooth, consistent idle without stalling. Making small, incremental adjustments is key.
Preventing Future Carburetor Clogs
An ounce of prevention is worth a pound of cure, especially when it comes to your leaf blower’s carburetor. By adopting a few simple habits, you can significantly reduce the likelihood of future clogs and ensure your blower is always ready for action.
- Use Fresh Fuel: Gasoline, especially ethanol-blended fuel, degrades quickly. Use fresh fuel, ideally no older than 30 days. Avoid storing fuel from season to season.
- Employ a Fuel Stabilizer: If you must store fuel or your leaf blower for more than a few weeks, always add a high-quality fuel stabilizer to the gas tank. Run the engine for a few minutes after adding the stabilizer to ensure it circulates through the carburetor.
- Consider Ethanol-Free Fuel: If available and economically feasible, using ethanol-free gasoline can drastically reduce the risk of moisture absorption and varnish buildup in your carburetor.
- Run the Engine Dry for Storage: For long-term storage (over a month), drain the fuel tank and then run the engine until it completely runs out of fuel and stalls. This ensures there’s no residual fuel in the carburetor to gum up.
- Regularly Check and Clean Filters: Inspect your air filter before each use and clean or replace it as needed. Also, regularly check the in-tank fuel filter and replace it if it appears clogged or dirty.
- Mind Your Fuel Mix: For 2-cycle engines, always mix oil with gasoline at the manufacturer’s recommended ratio. Incorrect ratios can lead to poor lubrication and carbon buildup.
Conclusion
A clean, properly functioning carburetor is the heartbeat of your leaf blower, ensuring it delivers consistent power and reliability for all your yard cleanup needs. While tackling a dirty carburetor might seem daunting at first, it’s a highly rewarding DIY project that empowers you to extend the life of your equipment and save on costly repairs. By understanding the common culprits behind clogs, carefully following the disassembly and cleaning steps, and committing to preventative maintenance, you can keep your leaf blower roaring to life season after season. Don’t let a small engine problem stop you in your tracks; take charge and breathe new life into your leaf blower today.
What maintenance tips have you found most effective in keeping your leaf blower’s carburetor clean and running smoothly?
Frequently Asked Questions
What are the main causes of leaf blower carburetor problems?
The primary culprits for Leaf Blower carburetor issues are stale or old fuel, especially gasoline containing ethanol, which can leave behind sticky deposits and attract moisture. Additionally, a clogged fuel filter preventing clean fuel flow or a dirty air filter restricting proper airflow can lead to an imbalanced fuel-air mixture, causing clogs and poor engine performance.
Can I clean a leaf blower carburetor without removing it?
While some basic carburetor issues can be addressed by spraying carburetor cleaner directly into the air intake while the engine is running, a thorough cleaning often requires removing and disassembling the carburetor. This allows for direct access to the jets, passages, and diaphragms where clogs typically form, ensuring all debris is effectively removed for optimal performance.